Monday, July 30, 2012

Mmmm Cheesecake!

So I heard this rumor it's National Cheesecake Day!  How are you celebrating?  I wish I had planned ahead and made my favorite cheesecake to enjoy today.  Of course I didn't, so I'm settling for sharing my favorite cheesecake recipe with you instead.  (Besides, I'd much rather share the recipe, than share the cheesecake!)


I have to confess that I used to despise cheesecake.  It was always just too rich and never tasted good to me.  I even sat on my sister's birthday cheesecake once, on accident (the cake was covered up), but I'm sure at the time she thought it was because I didn't like them!  So basically I avoided cheesecake until my husband introduced me to this recipe.  This New York style cheesecake is D-I-V-I-N-E!  The recipe is from Cook's Illustrated, who I always trust to come up with the best because they test everything and really get behind the science of how to cook, or in this case bake, well.

I'm not going to post the actual recipe because I'm sure its copyrighted.  The recipe is available on Cook's Illustrated website if you are a member or in a 2002 publication of the magazine (sorry I can't figure out which one at the moment!).  It's also been spotted on many recipe sites online.  The picture above is from The Baking Pan.  They include not only the cheesecake recipe, but also the amazing strawberry topping recipe to go with it.  They also give Cook's Illustrated the credit in their sources which so many other sites do not!

This cheesecake is great by itself, but a delicious topping really does put it over the top!  The strawberry is a regular around here, but I've also taken quite a liking to a blackberry topping made using the same recipe just substituting blackberries and blackberry jam.  So if you are planning on making this cheesecake, definitely plan on making a great topping too!


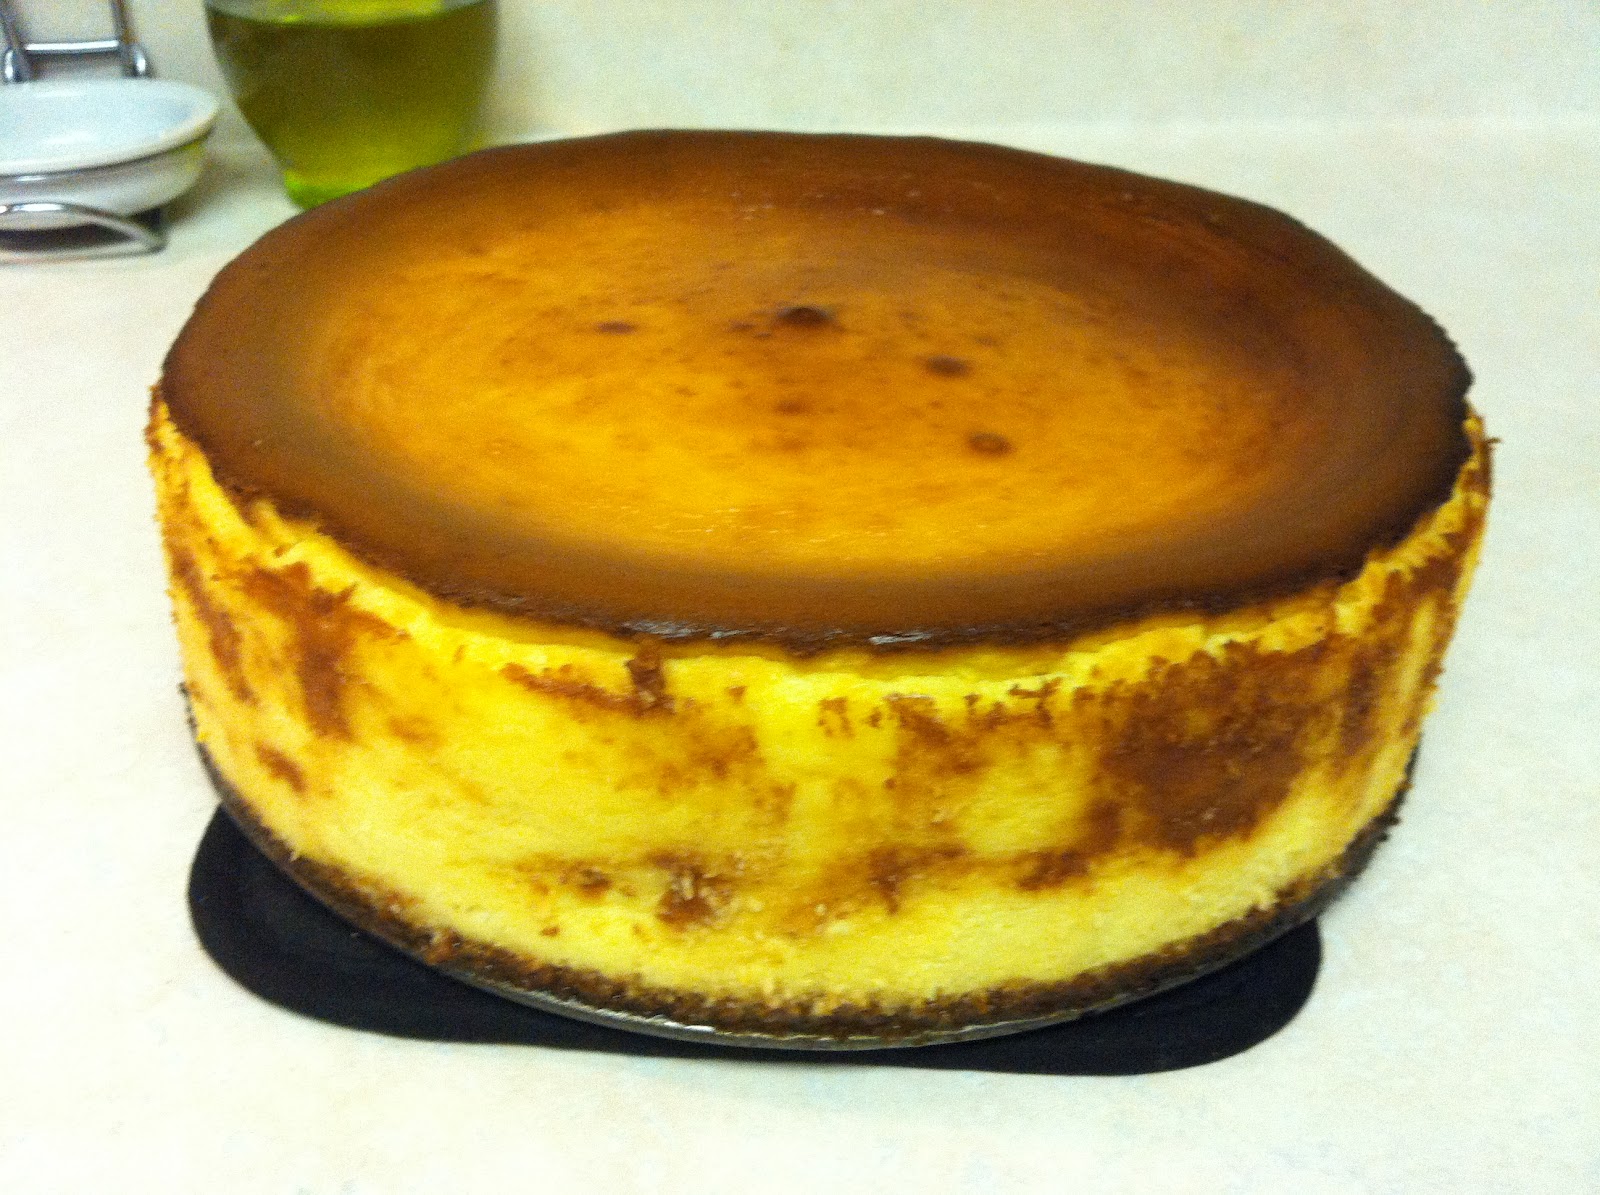
Here's a picture of the last cheesecake I made.  It may not be the prettiest thing in the world, but trust me it is one of the best tasting cheesecakes you'll ever eat!


And there's no reason you can't add a little color to it!  I made this cheesecake for my daughter's first birthday party last year.  The colorful surprise was definitely a treat!  Follow steps 6 and 7 on the cheesecake recipe found here to get the rainbow pattern.


I forgot to clean off the spatula before pouring the purple into the cake so that's why there are some plain cheesecake swirls mixed in on the top!  


That didn't stop us from enjoying it though.  Here's the birthday girl enjoying her slice!  I can't believe this was over a year ago already!!


Sunday, July 29, 2012

French for Kids - Wrapping Up and Ratatouille!

I intended on finishing all of my French week blog posts immediately after our French week, but of course that didn't happen.  With my daughter's second birthday party last weekend, and the planning and prep that went into it I got majorly sidetracked from blogging!  But better late than never right?

We ran out of time to do all of the projects I had intended for our Introduction to France week.  I went a little crazy with the lesson planning, and I scheduled the activities for the week my birthday fell on.  Basically nothing preschool related got done that day!  However, since we are going to continue incorporating French into our regular preschool routine, I'm sure we'll get to all the other fun projects eventually.

Although I've been practicing my French with the help of a few free iPhone apps, I'm no where near at a level where I could read a book in French.  So I decided to hunt for a book about France geared for kids, and I found this gem on our last trip to the library.  The book is about a girl who travels to Paris and visits all of the major landmarks there.  It is a very cute little story and very simple for young children.  At the end is a two-page spread with more details about all the landmarks mentioned throughout the book.  It's a fantastic way to introduce (or reinforce) these famous places.

Written by Leslie Kimmelman and Illustrated by Sarah McMenemy

The unexpected surprise in the book is the cute little rat hidden on every page!  My son had a blast searching for it in all the pictures.  He wanted to go through the book several times to keep finding the little guy over and over.  I think this would be the perfect story to read before or after watching the movie Ratatouille and/or actually making ratatouille with your kids!

Ratatouille recipe from SmittenKitchen.com

I didn't have what I needed on hand so I haven't actually made this dish yet (I need to remember to include grocery shopping in the lesson plans next time!), however this is a beautiful and I bet delicious recipe from Smitten Kitchen.  Kids would have a blast helping to layer in the veggies and it would also be a great opportunity to discuss the names of the vegetables and the names of the colors in French while you are preparing it!

We don't currently own the movie Ratatouille so that was also off the menu (pun intended!).  We watched Beauty in the Beast instead.  We've watched it before but it was a great way to finish off a fantastically French week.  My son was able to pick up on some of the French words that are said in the movie, and I pointed out a few he missed.


Although we didn't make the ratatouille we did enjoy some other French foods during our French week.  I already posted about how we made quiche, but no French week would be complete with bread!  I LOVE homemade bread and even though we've been low carbing recently, I made the splurge!  Here's a great YouTube video on an easy French bread recipe.  I have no idea if this is actually a truly French recipe, but it is truly good bread!!

Here's a picture of one of my loaves using this recipe.  It was perfectly crunchy of the outside and soft and chewy on the inside.  We ate one loaf right away with dinner, just sliced with a little butter.  The next morning we enjoyed some French toast, or "pain perdu", made from the other loaf of the French bread.
A sliced loaf of French bread

And that was the end of our Introduction to France week.  We spent a lot of time that week on repetition that's not necessarily easy to portray in these posts.   In the last few weeks, we've spent at least 15 minutes or more each day working on words, numbers, or basic phrases in French.  And it's paying off, because my son is very eager to learn how to say everything in French now!  He likes to randomly come up and remind me how to say his colors in French.  I love it!.  I'm also still adding to my "en Francais" board on Pinterest whenever I come across great French sites and other France activities for kids.    Become a follower to keep up with all of my latest finds!  I hope you've enjoyed and are inspired to share a little French culture and language with your children as well!


French for Kids - Favorite Songs

Throughout our French week, we worked on quite a few songs, "les chansons", and nursery rhymes.  This post is to share links to some of our favorites!

Link:  http://www.mamalisa.com/?p=22&t=ec&c=22
First up, an amazing compilation of songs and nursery rhymes including the French and English translations can be found here at Mama Lisa's World.  The ever popular "Frere Jaques" was definitely the easiest one for my four year old to pick up on.  We sing it in the car, in the bathtub, and everywhere else really.  Weeks later, he's still singing it!

There are so many songs on that website, and the best part is most of them include sheet music or links to MIDI files and MP3's so you can hear someone singing the song in French!


Our second favorite song during France week was "Alouette".  I have heard this song so many times before, but I never realized until that week what this song actually says!  The song is used to teach body parts, using parts on a bird, and actually refers to all the places you'll pluck feather off of the bird!!  I found this great video on YouTube that is a funky animated version of the song.  It reminds me of Angry Birds, and my son, a big fan of that game on my phone, absolutely loved watching this video and learning this song!

I'd point out the area of the body referred to when it was mentioned (pat my head for "tete", use my hand for a beak for "bec", make chicken wing arms for "les ailes", etc.).  The song "Head, Shoulders, Knees, and Toes" is also translated nicely in French and is a great tool for teaching parts of the body to youngsters.


I like this video for learning "les jours de la semaine", the days of the week, in French.  It has a nice melody, it repeats a few times for repetitions and once with only music giving you or your child the opportunity to say the words by themselves, and its a bright colorful video to watch as well.   


This is a cute and simple video for learning the number 1-10 in French.  I like the simplicity of this video and that it goes through the numbers forwards and backwards.  


This is another counting video, this time for number 1-20 in French.  I like this one because it includes the names of the numbers on some of the repetitions, and the animations are hilarious.  Perfect for keeping kids interested.  I don't get why worms with arms in Jamaica though!

I hope you enjoy these videos as much as we have!  YouTube has proven to be an excellent resource in my endeavor to teach French to our kids.  I have pinned a few more songs to my "en Francais" board over on Pinterest.  We still have several more I want to learn and teach the kids, and I'm always keeping my eye out for new ones to add to that list!


Friday, July 13, 2012

French for Kids - Weather and Numbers

Our Introduction to France week was a bigger success than I could have possibly imagined.  I'm so glad I did a lot of prep work in advance to come up with some really fun and engaging activities.  My son is all the time asking "How do you say ________ in French?"  I bought a kids' "first words" book in French for some basics, but I think I'm going to have to invest in a French-English dictionary to keep up with him!

Learn about Weather in French

On day three besides continuing to go over our days of the week names and basic sayings in French, we worked on weather terms and counting.  I had some weather cutouts from a preschool bulletin board I'd used last year (they're a little beat up but are still cute!), so I decided to turn them into a French weather pinwheel.  These are larger pieces that show a boy or girl standing in each type of weather, but a simple cutout of a sun, cloud, snowflake, etc would work as well!


We took a paper plate, flipped it over and glued the cutouts around the plate.  I used a permanent marker to write the names in French of each of the different types of weather, and wrote the French word for weather in the middle.  It's hanging up beside my son's impressionist artwork in our kitchen as well.  Each morning when we do our morning routine, going over the calendar and weather, we can say the weather term in French and English.

I used a single hole punch to put a small hole in the paper plate behind each of the cutouts so depending on the weather we can turn it around and that day's weather term will be facing up.  If I'd have really planned ahead on this, I would have used a small brad and attached an arrow in the center that could spin to point to that days weather!


I found two short videos on YouTube that we also watched to hear how to pronounce each of the terms.  This first video is a really short (just under a minute) video that just lists the French translation for sunny, rain, thunder, and snow.  http://www.youtube.com/watch?v=fkyh2dVFZxI.  The second video is a fun little song that teaches you how to talk about the weather in French.  My son really enjoyed this one:  http://www.youtube.com/watch?v=5I8KNtyZb4g.

Patterns & Counting

I think counting from 1 to 10 is often one of the first things taught when learning a new language, so it definitely had to make it into our introduction week.  It's also one of the few things I remembered from French class without having to look up!  My son already knows how to count to 10 in Spanish thanks to Dora and Diego, but I think before long he'll have it down in French as well.

To practice saying the numbers, I repeated them over and over counting on my fingers.  My son would repeat me after each number.  I repeated them several times as he worked on the pronunciation.  Then we started to count using these game pieces.  I had this bag of blue, white, and red chips in our craft cabinet leftover from a board game we used to have.  The colors were perfect for our French theme, and we got another chance to work on color names in French as well.  Check out my blog post on how we learned our color names in French here.

I used a dry erase board, but it wasn't really necessary.  I created a pattern and let him repeat it.  Then we'd count the chips.  Then I let him create patterns.  He'd ask me for a "bleu" chip or for a "blanc" chip.  


When he started creating patterns longer than 10 chips, I decided it was time to move on to the next activity.  Counting higher than 10 will have to wait until I remember more of French class or find a better YouTube video!

By the way, here's a link to a cute little YouTube video of a number 1-10 song in French:  http://www.youtube.com/watch?feature=fvwrel&NR=1&v=lsc3qLMaCu8.

To keep working on patterns and counting (I got him to start over at 1 after he reached 10, nothing like repetition!), we strung beads onto some string to make necklaces.  Blue, White, Red was the pattern like the colors on the French flags still hanging in our kitchen!


What's great about these patterns and counting is that it can be adapted to any language and with any colors.    It's all just about the practice and repetition!  And the necklace was a fun little keepsake from our Introduction to France week!


Wednesday, July 11, 2012

French for Kids - Colors and Quiche

For day two of Introduction to France week, we're delving into art and French cuisine.  After talking about the Parisian landmarks the day before, we spent a little more time on day two discussing the Louvre.  I once again hit Google for some great pictures of the famous building and some quick facts.  Did you know the Louvre is the most visited art museum in the world? (Hopefully I can be counted among those visitors one day!)

Next, I wanted to expand our French vocabulary to include colors.  I've hunted around for some French flashcards.  Everyone seems to carry Spanish ones, but French is incredibly hard to find.  And when I've found them, they just weren't at a price I was willing to pay.  So I decided to make my own.  I pulled out a few of my sons crayons and some blank note cards and got to work.  They're simple but they work just fine!


I'm contemplating making another set with only the French translation on there, but for now I also want my son to get used to recognizing the English words for these colors so I included both.  Practice these a few times, repeat often, and they'll have them down before you know it!

After we'd discussed the art museum and our colors, we had to put them to good use.  I thought about letting the kids paint, but since I had just cleaned up and organized the arts and crafts supplies, I decided to put a bunch of scrap construction paper to use instead.  I found some helpful videos that I could use to explain impressionist art very basically to kids.  This video is a quick background on Impressionism and Claude Monet:  http://www.ehow.com/video_12221608_make-impressionist-art.html.  I also found this great tutorial for teaching impressionist art using torn paper:  http://www.ehow.com/video_12222796_create-torn-paper-impressionist-art.html. 


Then came the really fun part.  The kids took the scraps of construction paper and torn them into a bunch of small pieces.  While we were doing this, I kept repeating the names of the colors in French for the color of construction paper they were using.


Once again, this activity was so fun and easy that my 2 year old could join in!  I asked my son to create a picture of flowers.  That was the only instruction I gave him besides "glue the pieces onto your paper".  And here's what he came up with!  He explained the juane (yellow) is for the yellow grass we have right now, and the blue near it is water that makes it turn green.  There are three flowers (he says they're roses!), and the long orange strips are tunnels and bridges for cars.  The blue at the top is of course the sky, and he mentioned that the green in the sky was just strange! 


I love it!  So it's now hanging in our kitchen as well.  French week turned out to be a huge hit, and this was only day two!!  


Quiche!

For lunch we made quiche which is awesome!  Way back in high school, one of my favorite things about taking French class was the French club breakfasts.  I think I've been making quiches ever since.  They're are simple, very easy to customize with whatever you have on hand, and so delicious!  

Our quiche was a chicken and broccoli quiche (with some zucchini mixed in too, hey use what you've got on hand right?).  I sort of followed this recipe:  http://www.genaw.com/lowcarb/broccoli_quiche.html from one of my favorite low carb websites.  Yes it's crustless, but I still call it quiche.  We can still learn about French culture without the extra carbs!


I diced the onion with about half of a zucchini and sauteed with garlic for a few minutes, until the onion and zucchini just start to become tender.  Then I added about a cup of leftover shredded chicken and the cooked broccoli.  I mixed half of the cheese into this mix and poured it into the pie plate.  Then mix the cream (I used whole milk and it turned out just fine), eggs and seasonings and pour evenly over the chicken and vegetables.  Top with the remaining cheese!   


I pulled it out of the oven after 35 minutes and let it rest for about 10 minutes.  It was perfectly set and absolutely yummy!

In case you missed the first day, here's the link to our Introduction to France week activites.  And don't forget to check out the day three activities at Weather and Counting in French.


Tuesday, July 10, 2012

Introduction to France for Kids!

It's been over a decade since I was in Madame Dubois French class.  There are a few words I still remember, and a few songs too.  My French teacher sure loved her songs!  I decided I wanted to start teaching my son French, and of course they always say the younger you are the easier it is to learn.  So it was time to get working on it!  I sat down at my computer to hunt for a preschool lesson plan or some other basic introduction to French for kids.  Turns out its a lot more difficult to find a good comprehensive lesson than you might think!

French Flag craft

So I've spent the last few weeks putting together my own plan after digging through countless webpages and YouTube videos.  The next few blog posts will be detailing our "Introduction to French" week.  I wanted this week to give my son a broad overview of France, learn a few basic French words, and learn about French culture.  After this week, we'll continue with French lessons a few times a week incorporate French translations for words or themes were working on in the future.

So lets get started!

Where is France?


First off, the kids needed to know what and where France is.  We got out our handy dandy toy globe and located France.  It's hard to see in the picture but it had a cute little picture of the Eiffel tower to make it easy to spot.  If you don't have a globe, an Atlas or a map online will do just fine too!  This particular globe is great because it talks when you push on a country and can give the kids neat little facts about each one.  

I pointed out where we are in the United States and how we would have to travel across the ocean to get to France.  I talked about how France is the largest country in Europe and briefly mentioned its neighboring countries.  I also told him how Paris is the capitol of France.  If you are using a more detailed map, you can point out some of the other major cities in France and also mountains, rivers, etc.  You could also print out a map of France and label all of those things.

The French Flag

Next we created a French flag.  This turned out to be a great activity, especially since we so recently did the American flag craft for the Fourth of July.  To make one flag all you need is a glue stick, a sheet of white construction paper and third of a sheet each of blue and red construction paper.  I went ahead and made three flags, one for each kid and myself and we have them proudly hanging in our kitchen for our French week!


I did a quick Google search to find out some facts about the French flag to share with the kids.  We also compared the French flag to the American flag.  Pointing out the similarities and differences.


This flag is so easy to make that even a 2 year old can do it!  And as you can see she was pretty eager to steal the glue and do it herself!


Here you can see the flags hanging in the background around our weekly schedule board.  While we were talking about France and Paris, we also discussed some of the popular landmarks around Paris including the Eiffel tower, Arc de Triomphe, Champs-Elysees, and the Louvre.  And to make it fun, the kids built a miniature Eiffel tower out of blocks!


If my printer was working, I'd have printed off some of the coloring/activity pages from:  http://www.coloring.ws/france.htm.  There is a flag page that kids can color in if you don't have construction paper handy.  And there's also a map of Europe and France that would be great to use.

Check out Day Two of our France week.  Learning about Colors, Art, and Food in France.

Check out Day Three of France week:  Learning about the Weather and Counting from 1-10 in French.

All of our favorite songs and videos from French week.

See how we wrapped up French week (or would have liked to) and some more tastes of French cuisine.

Au revoir!

Friday, July 6, 2012

The Ivory Soap Experiment

We finally got around to another one of the projects I've been meaning to do for so long.  Every time I think about doing this one in particular, I have to put it off because we never have the Ivory soap.  We only use Dove in our house, and I have always forgotten to pick up a bar of Ivory.  Well this morning, I had to make a special trip to the store for milk so it was the perfect opportunity to also pick up this soap.  And a few other things...seriously, who can go to the store and just get two things?  I know I can't!


Now that we had the soap, I couldn't wait to try the experiment.  I'm a big kid when it comes to this kind of stuff, and seeing my kids get all excited about it is just that much better!  I read a few of the other blog posts about this experiment, there are about a million of them..so just Google it!  But based on the recommendations, I decided not to put a whole bar of the soap into the microwave at once.  We cut our bar into three pieces.  It actually cuts really easily, and I used a butter knife!  I also opted to put it on a paper plate.  Some sites just said to place it right in the microwave or on a paper towel, but I was still a little weary of exactly what would happen, so I wanted to play it safe with the plate.

Before the soap went into the microwave, we talked about what my son, who's four years old, thought would happen.  He claimed it would heat up and turn into a cup.  I raised my eyebrow, as I'm sure you just did reading this!  And then I asked him what happened when we heat up food in the microwave.  He explained it gets hot, but it doesn't turn into a cup.  It stays food.  But he still kept to his theory that the soap would change to a cup!  Oh well, he's imaginative, and I couldn't wait to show him what was actually going to happen!  

I also read to microwave it from anywhere from 30 seconds to 3 minutes.  Quite a big difference.  Really it starts to expand almost immediately, and by 30 seconds it's about as big as it's going to get.  I tried to take a few pictures of it expanding in the microwave, but came out too blurry to really be helpful.  Make sure you hold your kids up or stand them on a chair (if they're big enough) to watch.  Actually seeing it expand is the neatest part of the whole experiment.  Well that, and the expression on your kids' faces while it happens!  When we opened the microwave door it did deflate a little bit, but as you can see by the picture, it definitely expands quite a bit from being heated up.  Another plus, it has a nice clean smell which lingers a while in the kitchen!


The outside of the foamy creation is cool enough to touch, but be careful about squeezing it or playing with it too much right away, because it is still quite warm right out of the microwave.  It looks much softer than it actually is too!  Once it cooled, it became crumbly and disintegrated into a substance much like the fake snow you can buy around Christmastime. Thank goodness we have a hand-vac to clean up that mess!!


In researching this experiment, I found there are lots of topics to discuss with kids while performing this soap trick.  I think 4 years old is a little young to fully understand the chemistry behind it, but we did have fun talking about how the soap changed, touching it, and smelling it.  Older kids might enjoy learning more about the chemistry aspect of foams and gases.  But we'll wait a few more years for that.

All in all, this was a super cheap, quick, and fun science experiment.  My two year old and four year old agree!  We had to do it 3 times to use up each piece of the bar!  And since I bought a 3 pack of the soap (only $1.24), we'll be able to do this experiment a couple more times in the near future!

Wednesday, July 4, 2012

Fourth of July American Flag Craft

Happy Independence Day everyone!  Hope all of you are enjoying your holiday wherever you are.  We'll be heading to a party later today, but now we're just enjoying a quiet (HAHA) morning indoors.  We got our holiday started with a fun little craft that is proving to be quite entertaining!

American Flag Craft


I came across this blog, http://iheartcraftythings.blogspot.com/2011/06/fun-simple-flag-craft.html from a pin on Pinterest.  There are tons of cute craft ideas, and this one definitely looked fun and simple as the title indicated.  I love finding projects where I've got all (or at least enough to make it work) supplies on hand already.  On a side note, I think we must have the same table where we do our crafts!  Check out the link above for the step by step instructions and pictures on how to make the flag.

Fun Simple Flag Craft from "I Heart Crafty Things"
I decided to give my son some practice cutting with scissors instead of using torn paper.  He definitely needs more practice, but he's getting there!  I didn't have any star stickers so he used a white colored pencil to draw stars on the flag.  I drew a few for him and he colored them in, and then practiced drawing his own.  Stickers would have definitely been more fun and realistic.  As you can see in the last picture, they don't look much like stars at all!  


After we finished making the flag, we decided to kick this craft up a notch.  We took 4 jumbo Popsicle sticks and glued them together.  Turns out, there was no way the glue was going to hold up to a 4 year old waving a flag around, so we wrapped masking tape all the way around the "pole" to secure it.  An empty wrapping paper tube, yard stick, or paint stir sticks would make good poles as well.


Now he's been running around the house like crazy, which is typical actually, but this time he's waving around his new American flag.  Now lets just see if he remembers any of the fun facts we talked about.  Enjoy your holiday everyone!  Happy Fourth of July!